I review a lot of stuff. And it’s rare that I actually fall in love with the object of the review. But the Blue Yeti X microphone is something that I’ve truly fallen in love with.
So why do I love the Blue Yeti X microphone?
It’s not its styling that has made me fall in love, although it looks fine. Neither is it the Blue Yeti X microphone’s features, although they’ve very strong. Nor, even, is it the microphone’s performance, which as we shall see is first class.
No, it is the Blue Yeti X microphone’s reliability.
It has been plugged into my computer for weeks. During that time, I’ve done video conferencing several times with, seemingly, the other end demanding the use of different software on each occasion. And every time the microphone has just worked. Each time I’ve finished off the discussion by asking the other end what they thought of the audio quality from my end. And each time they’ve been pleased with it.
Audio stuff has a habit of needing occasional disconnection and reconnection to work reliably. Not the Blue Yeti X. It seems that it just sits there, always ready.

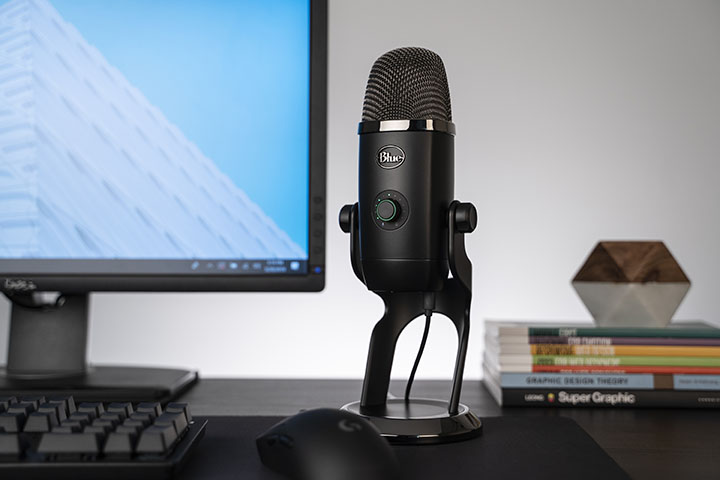
Blue Yeti X description
Well, you can see where I’m coming from in this review. But what is it that am I talking about?
You will recall that the Blue Yeti is a line of USB microphones, particularly popular with podcasters. That is, with people who want high quality desktop microphones which are affordable, reliable and easy to use. Indeed, we’ve reviewed some other models in the line over the past couple of years, here and here and been impressed.
The Yeti X is a step up from the main Yeti model. It has four 14mm condenser capsules rather than three. This permits it considerable flexibility in pickup pattern. Indeed, there are four patterns. The default is a cardioid pattern, more or less directional. This uses the capsule on the front. Stereo uses a capsule on the left side and one on the right side. Bi-directional uses the capsules on the front and back. That mode is useful when you’re interviewing someone across the table from you using just the one microphone. Finally, omnidirectional engages all four microphones.
You switch between the patterns by pressing the button on the back to cycle through the four options, or by choosing the pattern in control software on your computer. I’ll return to the software shortly.
When it’s just you, this is a front-address microphone. You don’t speak into the end of it like a stage mic, but into the front of it.
It comes installed on a desktop stand, upon which you can set its vertical angle. Or you can unscrew it and attach it to a microphone stand. It’s large and proud and weighs a little over half a kilogram.

Blue Yeti X microphone connections and control
The Blue Yeti X microphone is for computer users, full stop. There is no analogue microphone output. You plug it into a USB socket. The cable is provided. The microphone end uses Micro-B USB. This also powers the microphone. When it’s plugged in, it’s on.
The Blue Yeti X also includes a headphone amplifier. On the bottom of the microphone is a 3.5mm socket for headphones. What you hear is a mixture of audio from the computer and directly from the microphone. You can adjust the balance between the two.
In fact, the one knob controls all of this. By default, it sets the microphone level. As you rotate it, a set of up to eleven blue dots around the volume knob light to show you the level you’ve set. Down low, only the first few will be lit. At max, all eleven will glow. Briefly, that is, while you’re adjusting the level. Press the knob and it mutes the microphone. Press again, and the microphone is back in action.

Built in level meter
As the microphone picks up sound, the formerly blue LEDs now glow green to show you the actual recording level. At least, the first seven of them do. The next three glow yellow if it gets that high. And the eleventh glows red, indicating signal clipping.
At this point I’d like to note a mismatch. The signal clipped at around -1dB of the full digital scale. That was with a really short, sharp impulse – a close clap of the hands. It was the same with a bell I clanged closely to the microphone, except it was a bit clearer what was happening. With the first impulse, the sample only reached around -0.8dBFS. Then over the next few milliseconds, the clipping level reduced to around -1.9dBFS where it remained.

By way of contrast, I double-checked my test by repeating it with the Blue Ember microphone and my own microphone preamplifier/ADC – an RME Babyface Pro. With that, clipping coincided in the ADC and in the recording software.
I have no idea why the Blue Yeti X microphone wastes almost a full decibel – or two for more extended signals – of headroom in recordings. Anyway, keep that in mind. You’re not going to drive your Digital Audio Workstation into clipping no matter how hard you push it. Use the on-microphone meter, not your DAW meter. If you use the DAW’s metre, you could well be clipping the signal without knowing it.
Incidentally, that’s with all the “Blue Voice” processing switched off. Some of its modes invoke a limiter which will have very different effects on high received volumes.
Output control
Press the knob for a second and its function changes. Now it controls the headphone output level and the LEDs are white to indicate the set level. You can’t see the recording level in this mode, so it’s best to flick to it, set your headphones to your preferred level and then get back to recording level mode.
To get there, you first hold the knob in for another second. This gives you mauve dots and icons of a microphone and headphones. You can change the mix balance on this setting. One signal is directly from the microphone within the hardware, not via the computer. The other isn’t from the headphones. That icon is just used to indicate the sound that the computer is feeding out.
Hold the knob in for another second and you’re back where you started, at microphone level control.
But that’s not all.

Logitech G Hub and Blue Sherpa
Those levels and all the other settings can also be changed using software on your computer. You do not need a driver on either a Windows or Mac for the microphone. The Blue Yeti X microphone is clearly a USB Class 1.0 audio device, which has been supported natively by Windows for many years. Inspecting the Microphone and Speakers Properties panel in Windows, it’s clear that the microphone ADC (Analogue to Digital Converter) and DAC are locked to 24 bits of resolution, providing a choice only between 44.1kHz and 48kHz sampling.
So no drivers; the software is only for enhanced functions. Blue Sherpa is what Blue has been using for a couple of years for controlling some of its products. But Blue and Logitech recently merged and Logitech has been creating a new control system for its products. That’s called G Hub. Since I’m using a Logitech keyboard, mouse and webcam on my computer, G Hub controls all of them. Plus, the Blue Yeti X microphone.
I didn’t check out Sherpa. But Logitech G Hub does more than replicate the physical controls on the microphone. It lets you change the colours of the LEDs, apply some EQ, save those settings as presets, and use “Blue Voice” audio processing. This processing can control a high pass filter (ie. bass cut, to reduce handling noise and plosives), noise reduction, a gate, compressor and limiter and a De-esser. That last can kill the sibilance that comes with certain voices. There are a number of presets using various of these settings, but you can set and save your own.

Take a little care with those settings
A personal tip: if you do decide to use the gate, please add some noise – just some low-level white noise back into mix in post processing. It can be quite disconcerting to have a recording go full black in between each spoken phrase. Also note that using this can easily result in kind of pumping background noise level, which can be equally disconcerting.
In fact, all those options can, if not properly used, do strange things to your recordings or streaming. Fortunately, Logitech G Hub has a test feature built in. You can record some audio within the G Hub and then play it back with various settings to see how it sounds. Indeed, you can do it repeatedly, changing the settings for each listen. Then when you’re happy with the result, you start recording/streaming properly.
I found the microphone was surprisingly resistant to bass overload from plosive syllables spoken directly into it. And when talking across the front of the microphone, there were no problems at all. But there was some bass sensitivity to my hands on my desk. I tried killing the bass using the filter, but that also tended to colour the sound. The better solution was to simply put a couple of folded handkerchiefs under the base of the microphone. That absorbed most of the thump.

Using the Blue Yeti X microphone
During those video calls, which I mentioned earlier, I did not use headphones but my desktop speakers. I had the microphone centred on my desk and tilted back quite a bit. I was talking across it rather than at it. The directivity was so good that there wasn’t the slightest hint of feedback. The people with whom I was having discussions reported no echo of what they were saying back to them. That suggests very effective directional control by the Blue Yeti X microphone.
And as for the sound, it was simply brilliant. Tonally it was well balanced and enormously detailed. It was equally suited to voice and instrument. The upper frequencies extended out to beyond 20,000 hertz. And there was an open sense to the sound the Blue Yeti X microphone captured.
You might say that it was pretty much like a studio microphone.
I rang some bells and checked the recording, and it was clear that the Blue Yeti X microphone is able to capture out to 20kHz with no difficulties.
Conclusion
The Blue Yeti X is not cheap, but it is highly versatile, easy to use and produces excellent sound. You can read more about it at Blue’s website here.