
After two burst flexi-hoses in the space of a year, the first forcing us to move out for two months, I decided it was well past time to invest in a few water leak sensors.
Sitting on the couch, watching a movie on a Saturday night, the last thing you want to hear is the unexpected sound of running water in the next room. That’s exactly what happened to us in July 2024, when I dashed from the lounge room to the dining room to discover water pouring from the downlights.
A flexi-hose under the upstairs bathroom sink had burst, with the water flowing not only out of the bathroom into the upstairs bedrooms, but also down into the bathroom floor and then out of the ceiling below, where it created an indoor waterfall in the dining room.
Worse yet, I live in a narrow three-storey house, and the water even found its way down-downstairs into the rumpus room, below the dining room.
The big clean-up
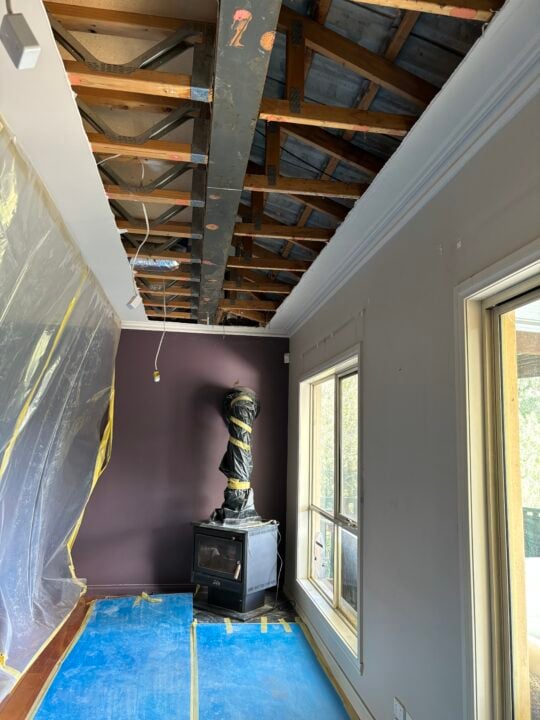
Hence began a two-month saga, with my family forced to move to my mother-in-law’s house around the corner as ceilings and carpets were replaced, as well as floors repolished.
While it was quite a drama, it would have been much worse had we not discovered the problem so quickly. All throughout the repairs, tradies kept telling me horror stories of burst water pipes that went undiscovered for days or even weeks while people were away from home.
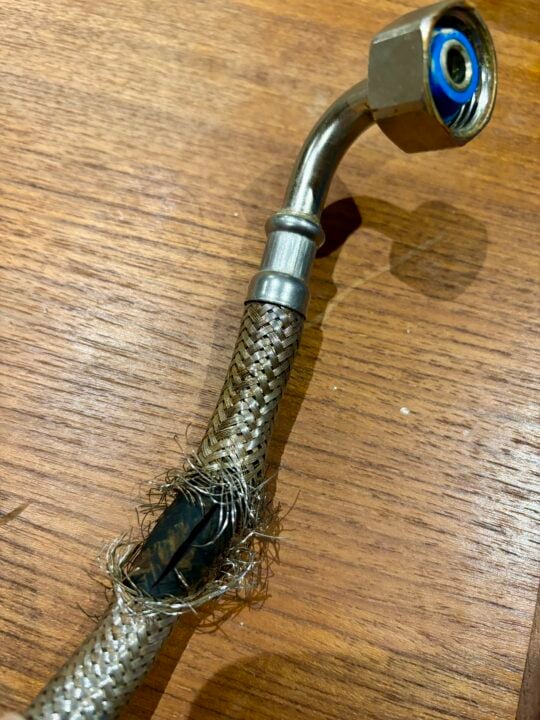
It seems that flexi-hoses are notorious for splitting, yet builders keep using them because they’re cheaper than running old-school copper pipes under the sink, from the wall valves all the way to the taps.
Apparently, flexi-hoses are only designed to last five to ten years, while rusting, fraying, and kinking can cause them to degrade even more quickly. My house is about 25 years old, and was clearly built by dodgy bastards on the cheap, so it’s perhaps a miracle that the hoses lasted so long.
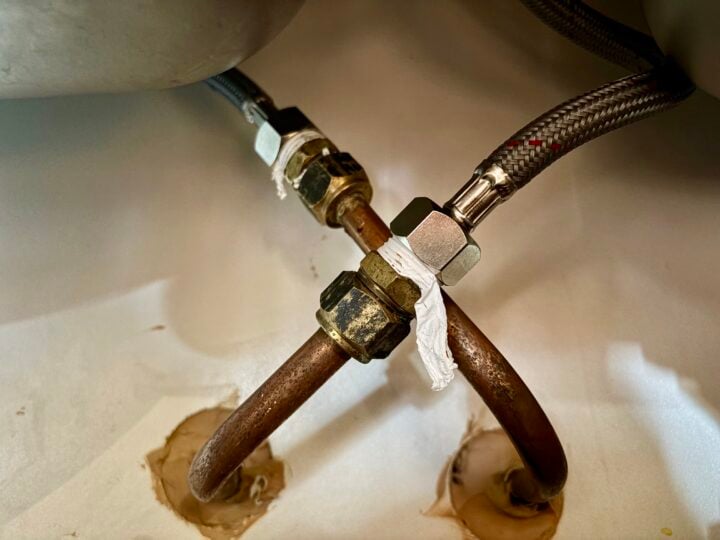
As a precaution, I replaced some of the other flexi-hoses around the house. I foolishly skipped the mixer taps in the upstairs ensuite, kitchen and laundry because they’re harder to reach – putting them on my to-do list, along with replacing the ageing hoses running to the dishwasher and washing machine.
Here we go again
Which brings us to last week, when my wife walked into the kitchen one morning to discover a growing pool of water on the floor, with a bit already leaking downstairs into the rumpus room.
This time, one of the flexi-hoses under the kitchen sink had developed a tiny split during the night, thankfully causing a much slower leak than last year’s burst hose. Even so, once again we were very lucky that someone was home and we discovered it quickly – mopping up without the need to call on insurance.
I decided my luck was running out, so I spent the day replacing the flexi-hoses under the mixer taps in the kitchen sink, as well as the basin in the upstairs ensuite. The dishwasher, washing machine and laundry trough mixer tap are still on my to-do list, but I will absolutely make sure I do them all this summer.
At the same time, I’m also going to install cheap plastic collars, known as flanges, around the drain pipes that go down into the floor, to seal off the gap.
When the dodgy bastards who built my house punched a water or gas pipe through the floor or wall, they rarely bothered to patch up the gap around the pipe. As a result, I’ve spent years fending off vermin like ants, crickets, mice, birds and even bees.
Pro tip: if bees are in your ceiling and coming down through the bathroom exhaust fans – which also happened to us this year – these Australian-made DraftStoppas are a god-send.
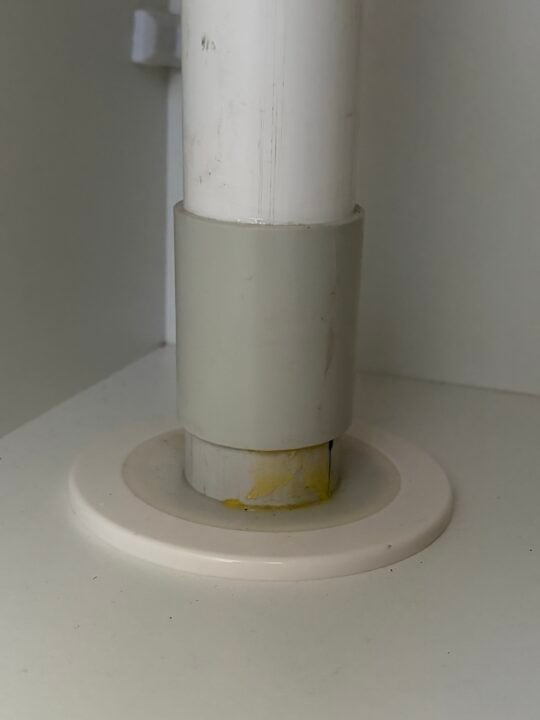
When the upstairs bathroom flooded last year, most of the water went down the hole around the drain pipe and into the floor, which is why so much ended up downstairs.
When the plumber replaced the water-sogged upstairs bathroom cabinet, they included these flanges, which I didn’t realise existed, to ensure that if it happens again, at least the water won’t go into the floor.
If you live in a multi-story house, do yourself a massive favour and add drain pipe flanges (not to mention water sensors) to the upstairs bathrooms. Make it a job for this summer, rather than waiting until it’s too late.
Time for water leak sensors
While I’ve made a calendar reminder to replace all the flexi-hoses every few years, I also decided it was time to get a bit more proactive. Next time one splits, I need an early warning system, rather than simply hoping we discover it quickly.
That’s where water leak sensors can save the day, but there are a few ways to approach the problem.
Some water leak sensors attach to your mains pipe, designed to detect unexpected usage and cut off the water. Others are simply water sensors, which sit under your sink and alert you when there’s a leak.
The first option sounds effective, but is also expensive, particularly because it needs to be installed by a plumber. So I went for the second option, thinking that if an alarm triggers when I’m away from home, I can always call family or friends and ask them to turn off the water to the house.
As an added bonus, if you place them in the right spot, water sensors can also detect a leak from your outgoing drain pipes, not just from your incoming water pipes.
Choosing the right water leak sensors for my home
At this point, I still had a few options from which to choose, so it was time to define my criteria and narrow down the field.
Some water leak sensors must be plugged into an AC wall socket, but that’s not practical in some areas of my home, so I need sensors that run on batteries. Wi-Fi is very power-hungry, so I wanted wireless sensors that rely on a low-power protocol like Zigbee or Matter.
Some water leak sensors are quite expensive and also require an expensive dedicated hub, but I wanted affordable sensors that would happily connect to my existing smart home gear. I also wanted to avoid an ongoing subscription.
Some sensors feature a built-in siren, some send an alert to your smartphone, but I wanted sensors that do both – so they’ll shout out even if the power and internet are out. Some sirens are only 60 dB, but I wanted at least 90 dB so we’d hear them around the house even when they’re in a closed cupboard under a sink.
As an added bonus, along with a siren, I also want to receive smartphone alerts, so I get a heads-up if we’re away from home
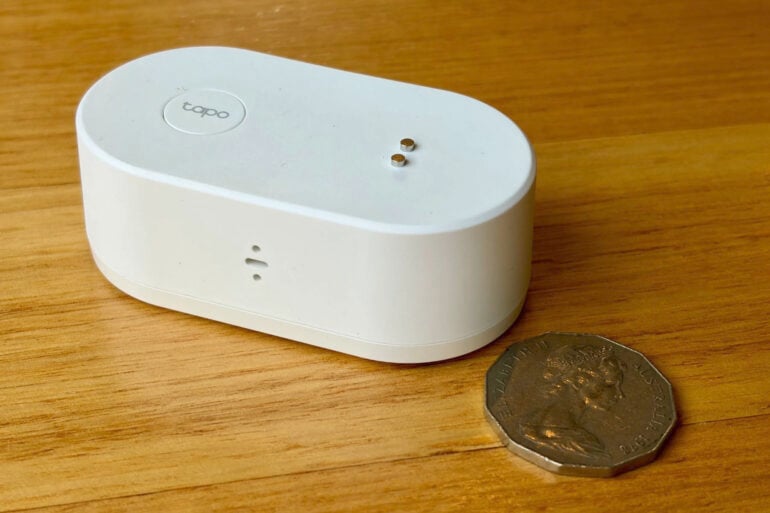
After weighing up sensors from Eufy, Eve, Tapo, Ikea, Aqara, Switchbot and FirePro, I decided to go with the $44 Tapo T300 Smart Water Leak Sensor – buying five to cover the various sinks around my home.
The replaceable batteries last up to three years, and you get a smartphone alert when they’re running low.

Setting up Tapo T300 smart water leak sensors
As they’re battery-powered and wireless, setting up the Tapo T300 water leak sensors is pretty straightforward using the TP-Link Tapo app. The biggest challenge is deciding the perfect place to put them.
Some water leak sensors feature a long sensor wire, which you can stretch out to cover a large area. The Tapo sensors lack this, but they do have the advantage of sensors on the top and bottom, to detect drips above as well as puddles below.
To get started, you pull the blue plastic tab from the battery compartment underneath, then run some water over the top and bottom sensors to set off the siren and check they work.
Next, you use the TP-Link Tapo app to add each water sensor to your account, which requires owning a Tapo Hub.
The box clearly says that you need a Tapo Hub to use the sensors, but I thought I might get away with connecting them directly to my Google Home speakers using the new Matter standard.
I was wrong: the app won’t let you proceed unless you have a Tapo Hub connected. That’s okay, I’d done my research and knew that Tapo’s most affordable hub – the Tapo H100 – was only $39.
As luck would have it, I also had a $249 Tapo H500 hub sitting in my office, waiting to be reviewed. It’s a fancy bit of kit, but probably overkill if you’re just looking to connect a few water leak sensors.
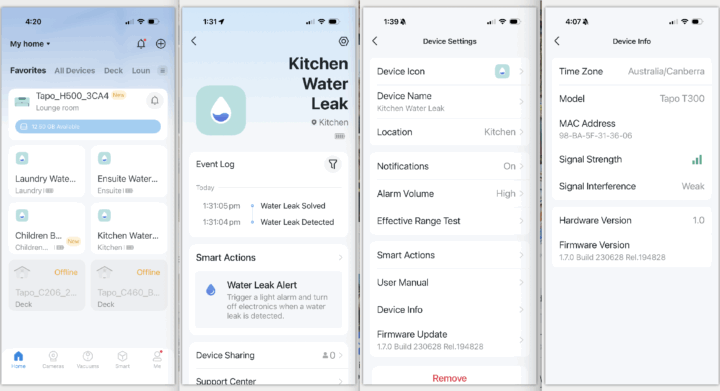
With the Tapo Hub set up, you hold the button on the water sensor to put it into pairing mode, add it to the app, allocate it to a room in your home and give the sensor a relevant name such as “Kitchen Sink”.
Placing the Tapo T300 water leak sensors around my home
TP-Link Tapo app offers a lot of useful information and features. You can see the battery level and signal strength, as well as adjust the volume of the built-in sirens. All of this is useful if you’ve had to hide the sensors in the back of an under-sink cabinet, rather than leave them out in the open.
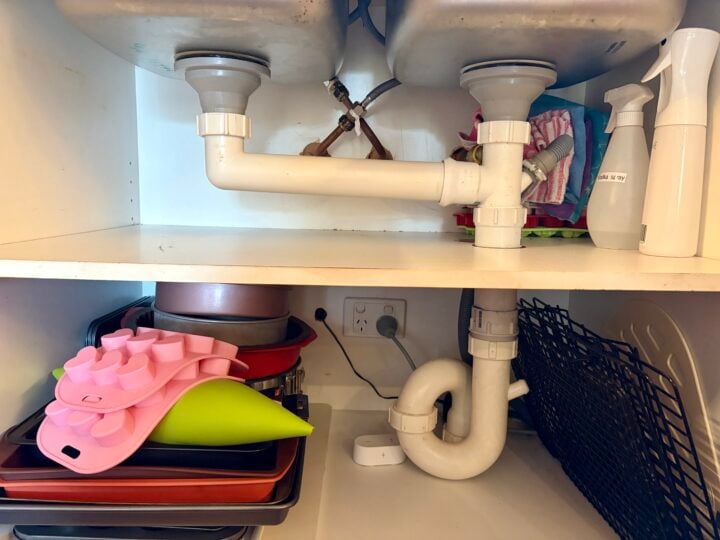
You need to give a lot of thought to placement, because things get complicated if you’re trying to cover rooms that feature more than one water source and you only want to use one sensor per room.
Water flows downhill, so you want to place them where they offer the most coverage, such as the bottom shelf of a cabinet with pipes running through each shelf. At the same time, you want to be sure they won’t get wet by accident.
It sounds simple, but it quickly gets complicated. Case in point, placing a water leak sensor in the cabinet under my kitchen sink probably won’t detect a burst water hose on the dishwasher, even though it is right next to the sink.
On the floor behind the dishwasher is a lower point than in the cabinet under the sink, but then water coming from under the sink wouldn’t reach the sensor. Of course, that’s assuming I can squeeze the sensor behind the dishwasher; it can’t go under the dishwasher because at 30 mm it’s too tall, whereas some water leak sensors are flat discs to cater for exactly this scenario.
For now, the kitchen sensor is under the sink, but I’m thinking the long-term solution is to squeeze it behind the dishwasher and drill a small hole from the cabinet to behind the dishwasher. This way, water coming from under the sink would still flow quickly to the sensor behind the dishwasher.
That’s on my summer to-do list when I replace the dishwasher hoses. I’ll need to be sure I reseal the holes where the bees were getting behind the dishwasher last year. Yep, we’ve been lucky enough to fight both bees and burst water pipes two years in a row.
It’s a similar complicated story in the laundry with the trough cabinet and washing machine, as well as the bathrooms, which feature both a toilet and a handbasin. Most toilets also use flexi-hoses, but thankfully, they’re less likely to get twisted or kinked than hoses under sinks.
Testing the Tapo T300 water leak sensors
Testing each sensor under the kitchen tap, they squawked after one second, and the smartphone alert arrived a few seconds later – which still pops up even if you’ve swiped up and killed the TP-Link Tapo app on your phone. You’re notified both when the event starts and stops, to help identify false positives while ensuring that you still catch intermittent leaks.
With the Tapo H500 hub installed on the middle floor of my house, the sensors on all three levels showed good signal strength even when hidden away in cabinets and behind the closed doors.
Testing the siren volume with the sensors in place, I’m glad I insisted on 90 dB, because they’re still muffled when hidden away in cabinets. They’re audible from the next room, but very difficult to hear between floors. Ikea’s $19 BADRING sensors are only 60 dB, which doesn’t sound like enough to me unless you’re sure they’ll be out in the open.
Even at 90 dB, if the siren sounded in my laundry on the bottom floor of the house, with the door closed, we’d never hear it upstairs in the dining room, let alone two flights up in the bedroom. That’s why it’s reassuring to have both audible sirens and smartphone alerts.
The TP-Link Tapo app also offers handy advanced features like triggering other smart home devices and linking to the Google Home ecosystem. You can also share access to the sensors, which is useful if you want to set them up for an elderly relative and monitor them from afar.
Hopefully, next time disaster strikes, the Tapo T300 water leak sensors will prove their worth and save the day. Now I just need Tapo to make vermin sensors to help us fend off the wildlife.