

Display screens are all well and good, but I maintain that the best way to view photos is on paper. That’s where the Canon imagePROGRAF PRO-300 professional photographic printer comes in. You can use it to produce beautiful printed images – professional quality ones – from your digital photos.
It allows big prints: A3+, which is 32.9 by 48.3 centimetres. With manual feeding, you can use paper up to one metre long. Also provided is a small plastic tray, with room for media up to 120mm by 120mm. One main purpose for this is to feed printable CDs and DVDs.
The printer uses ten Lucia Pro pigment-based ink cartridges for truly high-quality results. The maximum print resolution is 4,800 dpi horizontally, 2,400 dpi vertically.
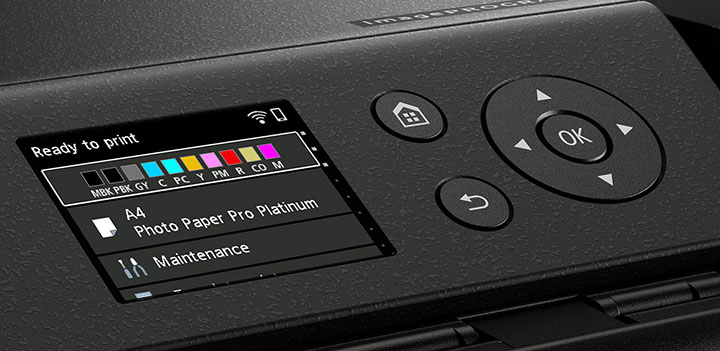
Of course, it’s a large printer, but with the input and output tray/guides folded in, it doesn’t use a ridiculous amount of space. The body of the printer is 639mm wide, 379mm deep and 200mm tall. The paper guide folds out at the top rear, while the output tray folds out at the front. The 75mm colour LCD display (it’s not a touch panel) is clear and gives good feedback on what you’re doing. A cluster of buttons provide that control, and for various activities, such as inserting paper, the display can give you instructions.
Connections are via USB directly to a computer, or by network connection with both Ethernet and Wi-Fi supported. I used Ethernet.
Review: Canon imagePROGRAF PRO-300 professional photographic printer
- Australian Website here.
- Manual or Support pages here. (Links at the bottom of the page.)
- Price: A$1,169 – seen online for $924.
- From: Legitimate retailers.
- Warranty: 12 months.
- Country of Manufacture: Unclear
- About: Canon, Inc is a Japanese company founded in the 1930s to make cameras. These days it still makes cameras, plus a whole lot more. It has in the inkjet game pretty much since the beginning of that technology. Back then Canon’s trade name for it was called “Bubble Jet”.
Setting up the Canon imagePROGRAF PRO-300
The printer had been doing the rounds so I didn’t get the whole setup-from-scratch experience. Indeed, the box was clearly marked that it had to be kept flat, since all the ink cartridges had been installed. But as is usually the case with these things, it is just a matter of placing the printer in a suitable place and pulling off all the bits of tape and orange-coloured chocks and locks that keep things from sliding around inside.
And then loading in the ten ink cartridges. Naturally the printer, and the driver installed on your computer, provides warning when one of the ink cartridges is running low. As supplied, the various ink cartridges were at all kinds of levels with a couple of them ready for replacement. Canon included two full sets of new cartridges for the review.
Installing them as needed was easy, once I re-accustomed myself to the fact that inkjet printers have their own personal needs. They frequently go and do seemingly inexplicable things. The purpose of them is often obscure, but presumably helpful for proper operation. In the case of changing the ink cartridges, you just open the cover and press the red button. Then nothing happens. For a while. Then the carriage holding the ink cartridges teases you by coming partway out into the open two or three times, before retreating again. But, finally, it comes all the way out. The cartridges slip out easy and snap into place with no fuss. Close the lid and then the printer is busy for a few minutes as it “agitates the ink”.

Consumables
The ten inks are two varieties of cyan, two of magenta, one yellow, one red, one grey, matte black and photo black, and something called “Chroma Optimizer”. They are rated to yield between 33 and 270 A3+ pages, with most of them rated at around 80 pages. They cost about $26 each – that’s $260 for a full replacement set, but because of the uneven use, buying them individually is usually the better way to go.
Of course, Canon sells its own paper. It provided three packs of extremely high quality paper in A3 size: Pro Luster, Pro Platinum and Photo Paper Plus Semi-Gloss. These come in packs of 20. Expect to pay something around $50 per pack. That works out to around $2.50 per sheet.
My naïve calculations suggest that you’d be using around 97 cents of ink per A3+ page. Putting it together, expect to pay around $3.50 per A3/A3+ print.
Can you economise on consumables? I would strongly oppose it for the ink cartridges. Who knows what havoc may be wreaked by the wrong ink, and the reason for buying a printer like the Canon imagePROGRAF PRO-300 in the first place is to get quality.

Paper? The printer has plenty of generic printer paper settings, so it may be worth experimenting. It also has some special presets for fine art papers. It can handle paper weights up to 380gsm, or a thickness of up on 0.6mm. All that said, there are specific presets for Canon paper. No doubt the printer has been optimised for those.
Printing on the Canon imagePROGRAF PRO-300
I did a couple of test prints on standard A4 plain paper, just to make sure it worked. Yes, you can use the printer to produce memos if you wish. Just in case.
But the rest of the time I spent using up some of that lovely Canon photo paper. I did most of my printing using Photoshop on my desktop, but I also tried out the Canon Print/Selphy app for a couple of pictures on my phone. Let’s deal with that one quickly, first.
I was disappointed with the first one. The image was smeared (not the ink, the image itself) and soft and not at all good. Then I realised that I’d picked the wrong image in the app. It does not have a good preview of the images, just tiny thumbnails which you select for printing. So use your regular photo viewer first to make sure you know what you want to print. When I selected the correct photo, it came out looking rather fine. I’d taken a comparison shot with a decent camera and printed it out as well, and the differences weren’t as marked as I had expected.
The app did have one quirk. In the print settings you can tick a box, telling it to use the settings already defined in the printer (you know, paper type and such). But the app reported that it could not work in this way, so I had to enter the settings myself.
And with Photoshop
Every time I review a fancy printer like this, I first spend a bit of time working out what size to make the picture in Photoshop. Your photos have an inherent size based on the pixel resolution. And they also carry and embedded dots-per-inch value in the file. That dpi setting is placed there by the camera and different brands place different values. For example, checking out a bunch of photos on my computer, I find that Sony cameras put in 350dpi, Nikon 300dpi or 240dpi, Fujifilm 72dpi, Canon 72dpi, my Huawei P30 Pro phone uses 96dpi, Panasonic 180dpi.
That value can be changed easily in Photoshop. You just go to image size, click on the “Resample” box so that it’s unticked, and type in the new value. The Width and Height figures will change to match if you have the units set to something other than pixels. There is absolutely no change in any way to the picture. You’re just poking a different dpi value into the file when you save it.
The reason that’s required is because Photoshop is pretty dumb. If you tell it to print a portrait of, say, 4,000 by 6,000 pixels and it has a 72dpi resolution set, you’ll just get a print of the person’s nose filling the print sheet.
I found the best way was, after cropping the image if required, to go into Image Size, set the units to centimetres (with resample off) and set the width or height to be slightly bigger than the sheet – that’s for the borderless printing. The final print resolution was typically around 350dpi. Since the printer has five to ten times that resolution available, it was able to easily handle such a low input resolution.
The print results …
… were simply gorgeous. A couple of family pictures were colourful and clean. I tried looking at the picture from odd angles so as to pick up reflections. Sometimes different inks give a different shininess. No such problems.
Those kinds of pictures are the bread and butter of any photo printer and, thus, relatively easy. So I tried a couple of night shots I’d taken during the smoke haze afflicting us on New Year’s Eve a year ago. Lots of deep, dark blacks, with smaller brightly lit areas. The blocks of deep black were perfectly smooth. Not once in all the prints that I made were there any semi-microscopic lines due to head or paper-advance inaccuracies.
Now those photos would have drawn on all nine of the colours available, plus the Chroma Optimizer. (Apparently Chroma Optimizer is an additional layer that evens up the level of gloss and enhances the underlying colours.) But a real challenge is producing high quality monochrome prints. I took a photo and carefully converted it to black and white, then printed in on full A3 paper. Presumably this could only use the black and grey inks. What I was looking for was the smoothness of gradients – any banding – and whether there was any visible dithering. The gradients were superbly smooth, without the slightest hint of banding. Beautiful. And dithering, if being used, was too small to be visible, even under a magnifying glass, even in the parts of the image that were almost perfectly white. The black sections of the print were deep indeed.
The pigment-based ink was quite impervious to splashes of water.
Speed?
Canon says that the printer takes around 255 seconds for a full A3+ colour print. Sounds about right. I did all my printing at the highest picture settings and they typically took about five minutes to come out. Often that included a few tens of seconds before much of anything productive happened as the printer did some under-the-hood preparations.
Seem a bit slow to you? Not to me. I’d rather it take plenty of time if that’s what’s required to ensure perfect results. Which is what it seemed to be doing.
Gadgetguy’s Take – the Canon imagePROGRAF PRO-300 professional photographic printer is a superb photo printer, producing magnificent results.
One final note: the first near-letter-quality printer I bought was I think the first model of HP Inkjet. It was 300dpi, black ink only – which ran if it encountered any water. The printer jammed with every second sheet of paper. And it cost about the same in nominal terms as the Canon imagePROGRAF PRO-300 professional photographic printer, which is to say about twice as much in real terms. Don’t we live in great times?


