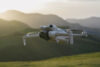
When it comes to drones, there are few companies that can compete with DJI. It has led the pack through relentless innovation in camera technology, flight control systems, and battery efficiency – and offers a versatile line-up to suit hobbyist, professional and industrial customers. If you’re not familiar with the Mavic 3 Pro, this is DJI’s flagship multi-purpose camera drone.
While it’s a fun and capable flying machine, at its core is a high-quality triple-camera system, designed to give creators the ability to find new perspectives for their cinematic aerial masterpieces. Think of it as a high-flying companion to DJI’s Osmo Pocket 3 and Osmo Action 4 cameras.
DJI Mavic 3 Pro Cine review
- Cine edition explained
- Specifications
- What’s in the box
- Advanced triple-camera system
- Key features
- DJI RC Pro controller
- Design and build quality
- In use
- Who is it for?
What is the DJI Mavic 3 Pro ‘Cine’ edition?
While DJI sells the ‘standard’ Mavic, which has a 2-camera system, the Mavic 3 Pro adds a 70mm-equivalent medium telephoto camera. And to take it one step further, there’s the Mavic 3 Pro ‘Cine Premium Combo’ edition, which offers a few extras for film and TV industry types, which is the version I’m reviewing.
The Cine version starts with the ability to record natively in Apple’s ProRes codec, inducing 422 HQ/422/422 LT formats. As ProRes can result in some very large files, there’s also considerably more onboard storage thanks to a 1 TB Solid State Drive (SSD). This is a massive leap up from the standard 8 GB included with the regular Mavic 3 Pro. Lastly, to help transfer the massive files from your drone to your computer quickly, you get a beefy 10 Gbps Lightspeed data cable. It’s also great to see that ProRes is supported across all three cameras, so you don’t have to choose between them, and it’s the industry standard for many commercial productions.
It should also be pointed out that the Cine version is five grams heavier, making it 968 grams compared to the standard Mavic 3’s 953 grams.
The Cine version costs $6,939, which is $1,610 more than the DJI’s Mavic 3 ‘Pro Fly More Combo’. This might seem like a lot, but for those in the commercial space with specific image quality and workflow needs, it could be just the ticket.

DJI Mavic 3 Pro specifications
| Camera Sensors | 4/3 CMOS Hasselblad Camera (20MP) 1/1.3-inch CMOS (48MP) 1/2-inch CMOS (12MP) |
| Focal Length | 24mm (equivalent), 70mm (equivalent), 166mm (equivalent) |
| Aperture | f/2.8-f/11, f/2.8, f/3.4 |
| Field of View | 84°, 35°, 15° |
| Focus | 1 m to ∞, 3 m to ∞, 3 m to ∞ |
| Video Resolution | 5.1K (5120×2700) 50fps, 4K (3840×2160) 120fps, 1080p (1920×1080) 200fps |
| Photo Resolution | 5472×3648, 8000×6000, 3840×2160 |
| Still Image Format | JPEG, DNG (RAW) |
| Video Format | MP4 (H.264/AVC, H.265/HEVC) |
| Max Flight Time | 43 minutes (without wind) |
| Max Transmission Distance | 15 km (FCC), 8 km (CE/SRRC/MIC) |
| Max Flight Speed | 75 km/h (Sport mode) |
| Max Wind Resistance | 47 km/h |
| Max Ascent Speed | 12 m/s |
| Max Descent Speed | 15 m/s |
| Hovering Accuracy (Vertical) | ±0.1 m (with vision positioning) |
| Hovering Accuracy (Horizontal) | ±0.5 m (with vision positioning) |
| Obstacle Avoidance Sensors | Forward, Downward, Backward, Left, Right |
| Vision Sensors | Upward, Downward, Forward, Backward |
| Operating Frequency | 2.400-2.4835 GHz; 5.725-5.850 GHz |
| GNSS | GPS, GLONASS, Galileo |
| Gimbal | 3-axis stabilized |
| Operating Temperature | -10°C to 40°C |
| Battery Type | Intelligent Flight Battery |
| Battery Capacity | 5000 mAh |
| Battery Voltage | 11.55 V |
| Battery Charger Type | 100W Power Adapter |
| Charging Time | Approx. 96 minutes |
| Dimensions (Folded) | 221×96.3×90.3 mm (Length×Width×Height) |
| Dimensions (Unfolded) | 347.5×283×107.7 mm (Length×Width×Height) |
| Weight | 905 g (including battery and propellers) |
| Price (RRP) | Mavic 3 Pro: $3,099 Mavic 3 Pro Fly More Combo: $5,329 Mavic 3 Pro Cine Premium Combo: $6,939 |
| Warranty | 12 months |
| More specifications | Official specs page |
What’s in the box?
- DJI Mavic 3 Pro Cine
- DJI RC Pro Control Sticks (Pair)
- DJI Mavic 3 Series Low-Noise Propellers (Pair) x 6
- DJI 100W USB-C Power Adapter
- DJI Mavic 3 Battery Charging Hub (100W)
- DJI Mavic 3 Pro ND Filters Set (ND8/16/32/64)
- DJI Mavic 3 Series Intelligent Flight Battery x 3
- DJI 10Gbps Lightspeed Data Cable
- USB-C to USB-C Cable
- DJI Mavic 3 Pro Storage Cover
- DJI Shoulder Bag

Advanced triple-camera system
The Mavic 3 Pro’s three cameras are housed on a three-axis gimbal that sits at the front of the drone. The 24mm-equivalent Hasselblad wide-angle lens is a real standout, thanks to its lifelike colours, a 4/3 sensor and 20MP resolution. The camera can capture 12-bit RAW photos and has a dynamic range of up to 12.8 stops for loads of rich detail.
The new 1/1.3-inch medium tele camera, with the 70mm equivalent lens, adds spatial compression to shots where you want to isolate the foreground object from the background. This medium-tele lens is helped by the f/2.8 aperture, 48MP resolution, 3x optical zoom, and is capable of shooting at night via a ‘night mode’.
Moving to the 166mm telephoto camera, which has been upgraded to a f/3.4 aperture. This is a ½-inch sensor, with 12 megapixels, and its zoom ranges from 7x optical up to 28x ‘hybrid’.
All three lens systems support 10-bit HLG as well as DJI’s D-Log M, so there are plenty of colour grading options and consistency regardless of what camera you’re shooting with.
Key features
Apart from the three-camera system, standout features on the Mavic 3 Pro include omnidirectional collision avoidance and ActiveTrack 5.0 support. The collision avoidance system helps the drone sense objects in space around it from all angles, and it can dynamically compute flight paths around those objects on the fly to avoid running into things.
ActiveTrack 5.0 helps you capture and keep your subject in frame thanks to the gimbal and flight computer. Essentially, you can select objects on the controller’s screen and the gimbal will actively follow the object. Depending on the mode, this extends to the drone itself, which will keep up with a moving object, or perform a variety of pre-planned manoeuvres, such as orbits or follows to create a specific shot.
And with impressive flying performance, easy-to-use controls and a 43-minute flight time, you can focus your attention on creativity rather than worrying about how to fly your drone.
DJI RC Pro controller
The Cine bundle comes with the DJI RC Pro flight controller instead of the more basic DJI RC model. This costs $1,529 versus the base model’s $399, with a brighter 5.5-inch HD screen as the main benefit. This is rated at 1000 nits versus the 700 nits of the RC model, ideal for use in direct sunlight. There’s also a more powerful processor and GPU, which enables the use of third-party Android apps (via APK) right on the device.
The RC Pro controller has an improved three-hour battery life, which is still an hour less than the base model, and they both get support for DJI’s O3+ transmission system. With this, you can stream 1080p video at 60 frames per second (fps) over distances up to 15 kilometres. The Pro model also has four antennas, up from two, to help provide better reception. Lastly, the RC Pro uses the same high-precision control sticks as the DJI FPV controller for a smoother and more responsive feel.
Design and build quality
The DJI Mavic 3 Pro follows the usual propellor-blades-at-the-end-of-extendable-legs configuration. The removable battery takes up the bulk of the drone’s body, with the three-axis gimbal at the front. Batteries can be slotted in easily, and there’s a USB-C and Micro SD card socket behind a rubber cover directly above the battery bay.
The drone is peppered with eight wide-angle vision sensors that are used for the omnidirectional collision avoidance system, and there are multi-colour LED lights at the ends of each leg for day and night-time visibility. When you pack it up, the legs fold inwards and there’s a little cover that protects the gimbal and cameras. You can put everything you need for extended flights into the compact carry bag including the controller, three batteries, charger and cables.
All up, DJI has seen to it to ensure that all the bits are high-quality and well built, including the batteries, which have at-a-glance LED charge level indicators, and the 100W charging dock has two USB-C connectors so you can top up the RC Pro controller and all three batteries at the same time.

DJI Mavic 3 Pro in use
The last drone that I spent time flying didn’t have many automated features. It was refreshing then to operate the Mavic 3 Pro, both in terms of how easy it was to jump right in, and how the RC Pro controller provided a great interface, so I’ll start there.
The extra money you pay for the RC Pro controller’s high-brightness touch-screen seems well placed, as it was very bright and sunny during my tests but I could still see what I was doing. As the screen is essential for flying, it’s good that there’s a pro-level 1000 nits version for those who want something suited to more conditions.
The antennas fold up making it easy to back in the included carry bag, and there are USB-C, full-sized HDMI and MicroSD card slots for charging, transferring data and connecting to an external screen.
Given the more powerful CPU and GPU of the RC Pro model, I also found this to be quite responsive when scrolling maps and menus, and there was little delay when switching between camera modes.
The controller is also solidly built, with plenty of dedicated and programmable buttons, and the control sticks are nimble and responsive. The essential Return to Home and Emergency Stop, buttons are easy to reach.
There’s a dedicated switch for selecting the three flying modes too: Sport, Normal and Cine. Sport shuts off the object avoidance system and maximises flight speed and responsiveness, so you can fly manually however you want. Normal and Cine have collision avoidance engaged, however, in Cine the drone moves at a slower pace to smoothen out your filming.
Taking flight
The Mavic 3 Pro is certainly quick enough for my needs, and I found that I used the Normal and Cine modes most often. It can zip around at up to 75km/h, with an 8 m/s ascent and 6 m/s decent rate, which should be fast enough for most of us.
During testing, the Mavic 3 Pro was responsive to control inputs and stayed reasonably in place during high gusts of wind. I shot some footage for a car video on a windy day, and this was a perfect demonstration of how well the Mavic could stabilise itself while I tried to grab static overhead shots with my car driving beneath it.
I was also a little intimidated, if not outright afraid, of just how far this little machine could fly away from where I was controlling it. While keeping in line of sight, it was still very easy to send the drone quite far down the coastline during a recent trip to the Jervis Bay area, and it can also climb to a maximum altitude of 6km.
When far away, it’s important to orient the RC Pro’s antennas towards the general area of the drone, and I didn’t have any major issues with connectivity when about 10km away. The video streaming held solid, only once breaking up for a few seconds when the antennas were pointed away from the drone’s position.
The Advanced Return-to-Home (RTH) feature makes you feel better in case the battery gets low, or you somehow lose connection with the drone. The ‘advanced’ version is more intelligent than the basic RTH system, as it’s able to plan a path home and avoid obstacles it may encounter on its way.

You can see its path home on the map, and this worked as expected during testing. One time, it landed about one metre away from its take-off spot, but I think this was due to the wind. I used the handy RTH button on the controller to wrap up many of my flights, rather than directing it back myself.
There’s also a Cruise Control setting that continues in the same direction and altitude without needing to continually push on the control sticks. This is handy for longer flights but it did make me nervous. I assume the object avoidance system would kick in if there was a problem, however, I wasn’t game to test this.
While the 5000 mAh battery is rated for 43 minutes, I can’t say that my flights lasted quite that long, but not far from it, as wind and temperature will have an impact on your total flying time. There are three batteries in the Cine kit, so I didn’t worry much about running out of flight time as it was easy to swap when one ran out.
If you want to get even closer to the action, the Mavic 3 Pro is compatible with the DJI Motion 2 FPV goggles and DJI Goggles Integra too.
Filming
In practice, capturing footage was quite straightforward. The three-axis gimbal ensured smooth, vibration-free video, and the RC Pro’s 5.5-inch high-brightness screen was easy to see, though I certainly needed my glasses to read the symbols on the interface.
You can swap between your flight map and the camera’s view and change between cameras via three small buttons on the interface. Sometimes it’s easy to forget what camera you’re using, as some provide zoom and some don’t. However, it doesn’t take too long to get used to it.
The three-axis gimbal is quite straightforward. You can either set it in a ‘Follow’ mode, which locks the horizontal plane and is good for photography or ‘FPV’ mode, where it moves with the direction of the drone.

Otherwise, you can tilt the gimbal via one of the RC Pro’s two controller wheels, and the other adjusts your zoom level. To enable tracking, simply draw a box with your finger around the object on screen. Adjusting exposure is as simple as tapping on an object. There are triggers for initiating recording and shutter, and it’s great that the shutter button also registers a half-press to engage focus.
To review captured footage, you can navigate via the menus to see stored ‘preview’ clips of your recordings, as the full-resolution versions are stored on the drone itself.
I liked the Waypoint feature, where I could plot out a little flight path, and the drone would simply fly to those points and repeat the entire path when finished. This way, I could focus more on my video capture than flying, and endure I was happy with the shot.
If you want to automate things a little more, there are ‘actions’ for each waypoint, such as taking a photo or recording video, along with setting the hover time, gimbal tilt and zoom level. You can even determine a ‘Point of Interest’ near your waypoints so the cameras will always point towards it.
For more involved filming, there’s ‘Vision Assistance’, which is a suite of features that helps you keep track of the drone’s position. This is when the view out of the ‘filming’ camera is not adequate for tight spots and adds an avoidance sensor’s view via a picture-in-picture window. With it, you can see what the avoidance sensor can see, so you could be looking backwards to avoid hitting a tree while the main camera is pointing forward. It’s sort of like a car’s reversing camera, only you can switch to the left, right, and front collision cameras too. The window even indicates how close you are to an object via a yellow or red border. There’s also ‘Nocturnal Assistance’ which makes it easier to see in low light.’ sort of like a car’s reversing camera, only you can switch to left, right, and front collision cameras too. The window even indicates how close you are to an object via a yellow or red border. There’s also ‘Nocturnal Assistance’ which makes it easier to see in low light.
Motion tracking
The Mavic 3 Pro’s tracking capabilities are a great way to lock your subject in the frame when recording video. Called ‘FocusTrack’, this uses DJI’s ActiveTrack 5.0 system, and comes in a few modes including Tracking, Spotlight and Point-of-Interest (POI). All modes are supported by the Hasselblad 24mm wide camera and 70mm medium-telephoto, but only Spotlight and POI modes are available with the 166mm telephoto.


I used Tracking mode to follow my subject as she ran along a path near the ocean and again in a forested area. I liked how I could set the drone’s position via a ‘clockface’ icon, and was able to transition to rear, side and front positions. You can also choose between ‘trace’ and ‘parallel’ camera positions. During my track, both the drone and gimbal worked in tandem to keep my subject in the frame, and the drone negotiated nearby trees without any intervention, which was pretty impressive.
The Spotlight mode is similar to Tracking, however, it mainly uses the gimbal to keep your subject in the centre of the frame and gives you more control over the flying. This could come in handy for all sorts of applications where you want to direct the flight path and let the gimbal do the rest.
The POI mode will track your stationary or moving subject in a circle, based on a set radius and flight speed. So, if there’s a building, vehicle, landscape, creature or other object of interest, your drone will track its position and orbit above it.
Creative modes
There are some pre-set creative shot options too, starting with ‘MasterShots’, which captures a number of shots for a video template. This is sort of a press-and-forget type of thing where it does it all for you.
I preferred the more accessible ‘Quickshots’ feature, and these are simple, pre-defined drone and gimbal moves. To initiate, you drag a square around your subject, such as a car in a parking lot, and select the shot such as Dronie, Rocket, Circle, Helix, Boomerang or Asteroid.
Some are self-explanatory, such as Rocket, which ascends rapidly with the camera pointing downwards at the subject. Dronie, on the other hand, is when the Mavic 3 Pro flies backwards and upwards with the camera locked on the subject. Asteroid is another neat one, where the drone flies back and upwards from the subject, then takes several photos and swoops back down. The video it creates starts from its highest point and films the descent back to the start.
Once finished, you can edit, view and even share to social media, right from the RC Pro control screen.
When creating Hyperlapse videos, which are essentially timelapses, you can choose between different route options like Free Flying, Circle, lock a direction or subject, or set a series of waypoints. You then choose your interval time, video duration and max speed.
Image quality
DJI has been making cameras for quite a while so I was expecting to see some high-quality results. I wasn’t disappointed, especially when looking at 10-bit D-Log M footage in my editing software. A benefit of the Cine package is that HLG and Log are supported across all 3 cameras, so I didn’t have any headaches when mixing footage from all 3 sources into the same video.
I was also really impressed with DJI’s standard colour science, with great accuracy, saturation and white balance right out of the box. The Hasselblad footage, especially at 5.1K captured incredible detail, but I loved the versatility of the 70mm 1/1.3″ medium tele lens. This really elevates your creative options and is a great middle-ground for times when the 24mm is too wide and the 166mm is too long.


The 166mm tele lens is fantastic for getting right up close to your subject while maintaining a healthy distance, and fully zoomed-in shots were surprisingly detailed given the relatively low-resolution 12MP sensor. This tele could probably use a larger sensor in its next iteration, but this is a small detail.
It was also handy to have 4K/60fps recording across all lenses, so there was no need to downgrade a video project’s frame size to suit a particular camera. For super-slow motion, the Hasselblad can also manage 120fps at 4K DCI, but it would be great to see this on the 70mm lens too. I didn’t do a lot of low-light recording, but the f/2.8 apertures of the 24mm and 70mm cameras should manage well enough.
Who is the DJI Mavic 3 Pro Cine for?
The DJI Mavic 3 Pro, with the Cine Premium Combo package, delivers an incredibly versatile and pro-oriented platform for capturing stunning photos and videos. While the upgrade cost from the base Mavic 3 Pro is steep, for creative professionals, this offers a number of quality-of-life features that improve image fidelity and streamline your workflow. As a drone, it’s well-designed, has an excellent collision avoidance system and is a very capable flyer. It’s also paired with an excellent RC Pro controller, which is designed to manage sunny conditions, with a solid user interface for flight controls, tracking and video streaming.


The Mavic 3 Pro has loads of creative features that will complement your shot list, and the addition of the 70mm camera to the already excellent 24mm Hasselblad is a triumph. And the 166mm tele with 28x zoom is the icing on the cake. If you’re a creative professional who wants to expand your shot options or a well-heeled hobbyist, the DJI Mavic 3 Pro Cine Premium Combo will make a great addition to your kit bag.
GadgetGuy occasionally uses affiliate links and may receive a small commission from purchased products.